
Welcome to the wonderful world of fishkeeping! Setting up your first aquarium is an exciting journey that brings a slice of nature into your home. It can be a serene and rewarding hobby, but it also requires some initial knowledge and patience to get right. This guide will walk you through every step of the process, from planning to introducing your first fish, to ensure you create a healthy and thriving ecosystem.
Step 1: Planning & Decisions
Before you buy anything, it’s crucial to have a plan. The choices you make now will determine the long-term success of your tank.
– Freshwater vs. Saltwater: For beginners, freshwater is highly recommended. It’s generally less expensive, easier to maintain, and more forgiving of mistakes than a saltwater setup.
– Tank Size: The golden rule of fishkeeping is “bigger is better.” Larger volumes of water are more stable and less susceptible to rapid changes in water chemistry, which is a common pitfall for new hobbyists. A 20-gallon long tank is an excellent starting point. It provides ample swimming space for fish and is manageable to clean. Avoid tanks smaller than 10 gallons for your first setup.
– Location: Choose a location for your tank that is:
– Away from direct sunlight: Sunlight will cause uncontrollable algae growth and temperature fluctuations.
– Near a power outlet: You’ll need to plug in your filter, heater, and lights.
– On a sturdy, level surface: Water is heavy! A 20-gallon tank can weigh over 200 pounds when filled. Ensure your stand or furniture can support the weight.
Step 2: Essential Equipment Checklist
To create a livable environment for your fish, you’ll need the following equipment:
– Aquarium Tank: A 20-gallon tank is ideal.
– Filter: A filter is the heart of your tank, keeping the water clean and providing a home for beneficial bacteria. For beginners, a Hang-On-Back (HOB) filter is easy to use and maintain.
– Heater: Most beginner-friendly tropical fish require a stable temperature between 75-80°F (24-27°C). A submersible heater is essential.
– Substrate: This is the gravel or sand at the bottom of your tank. It provides a place for beneficial bacteria to live and an anchor for plants. Natural-colored gravel or sand is a great choice.
– Lighting: A basic LED aquarium light is necessary to view your fish and is crucial if you plan to keep live plants.
– Water Conditioner: Tap water contains chlorine and chloramines, which are deadly to fish. A water conditioner neutralizes these harmful chemicals.
– Thermometer: To monitor the water temperature.
– Decorations: Rocks, driftwood, and plants provide hiding spots and make your tank look natural.
– Fish Net & Siphon: For catching fish and performing water changes.
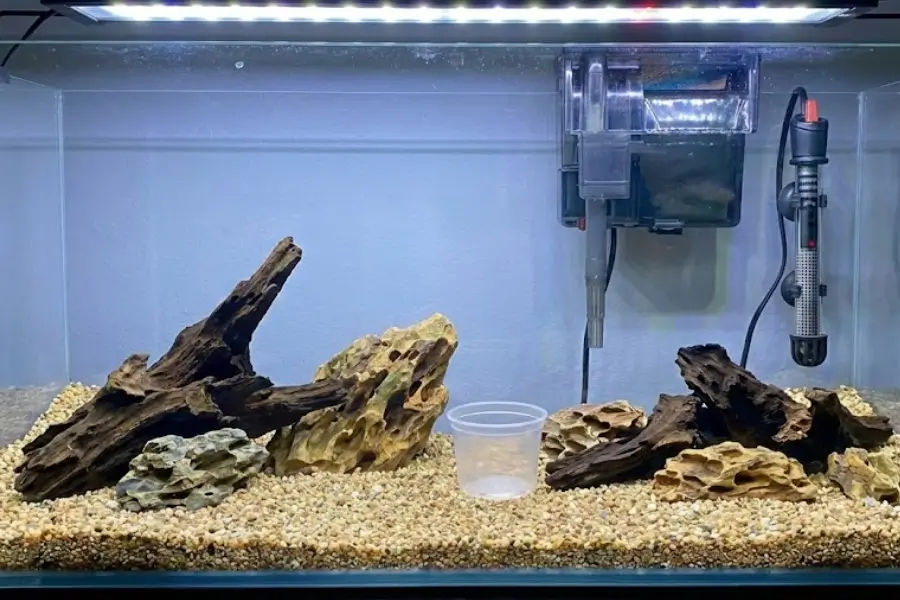
Step 3: Setting Up the Tank (The Build)
Now comes the fun part: putting it all together!
– Clean Everything: Rinse your new tank, substrate, and decorations with plain water. Never use soap or detergents, as even a small residue can be toxic to fish.
– Place the Tank: Position your tank on its stand. Ensure it’s perfectly level.
– Add Substrate: Gently add your rinsed gravel or sand to the bottom of the tank, creating a layer about 2-3 inches deep. You can slope it slightly towards the back to create depth.
– Install Equipment: Place your filter and heater in the tank according to the manufacturer’s instructions, but do not plug them in yet.
– Add Decor (Hardscaping): Arrange your rocks, driftwood, and other decorations. This is where you get to be creative! Create caves and hiding spots for your future fish.
– Fill with Water: Place a small plate or a plastic bag over the substrate to prevent it from being disturbed, and slowly fill the tank with tap water.
– Add Water Conditioner: Add the recommended amount of water conditioner to your filled tank to make the water safe for fish.
– Turn on Equipment: Once the tank is full and the conditioner is added, you can plug in and turn on your filter, heater, and lights. Make sure the heater is fully submerged before turning it on.
Step 4: The Nitrogen Cycle (The Most Important Step)
This is where many beginners go wrong. You cannot add fish immediately. Your tank needs to establish a colony of beneficial bacteria that will convert toxic ammonia from fish waste into less harmful nitrates. This process is called “cycling” and it usually takes 4-6 weeks.
– Fishless Cycling: The most humane way to cycle is without fish. You can do this by adding a small source of ammonia (like fish food) to the tank daily to “feed” the growing bacteria colony.
– Testing is Key: You’ll need an aquarium test kit to monitor your water’s ammonia, nitrite, and nitrate levels. Your tank is cycled when:
– Ammonia is 0 ppm
– Nitrite is 0 ppm
– Nitrate is showing a reading (usually between 10-40 ppm)
– Patience is a Virtue: Do not rush this step. Adding fish too soon will lead to “New Tank Syndrome,” where your fish will be poisoned by their own waste.
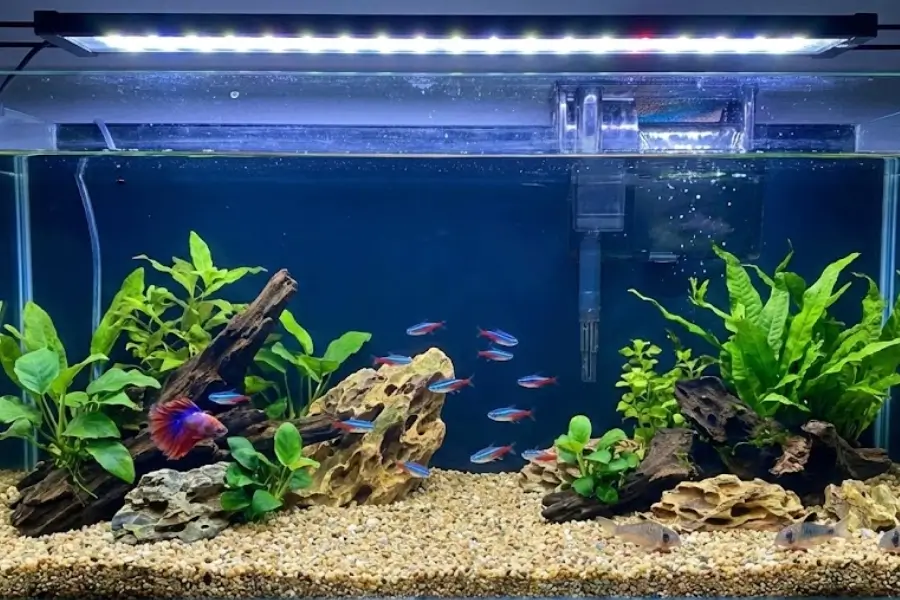
Step 5: Adding Your First Fish
Once your tank is fully cycled, you can finally add fish!
– Start Slowly: Add only a few fish at a time (e.g., 3-4 small fish). This gives the bacteria colony time to adjust to the new bioload.
– Choose Beginner-Friendly Fish: Look for hardy species that are easy to care for, such as:
– Small Tetras (e.g., Neon Tetras, Ember Tetras)
– Rasboras (e.g., Harlequin Rasboras)
– Corydoras Catfish (great for cleaning the bottom)
– A single Betta fish (if kept alone or with appropriate tank mates)
– Acclimation: Float the bag containing your new fish in the tank for 15-20 minutes to equalize the temperature. Then, gradually add small amounts of tank water to the bag over another 15-20 minutes before gently netting the fish and releasing them into their new home. Do not pour the water from the bag into your tank.
Step 6: Maintenance Routine
A consistent maintenance schedule is the key to a long-lasting, healthy aquarium.
– Daily: Feed your fish (only as much as they can eat in 2-3 minutes), check the temperature, and observe your fish for any signs of illness.
– Weekly: Perform a 10-20% water change. Use your siphon to vacuum the substrate, removing uneaten food and waste, and replace the removed water with fresh, conditioned water of the same temperature.
– Monthly: Gently rinse the filter media (sponges, cartridges) in the old tank water you removed during a water change. Never rinse them in tap water, as this will kill the beneficial bacteria. Replace filter cartridges only when they are falling apart.
Conclusion
Congratulations on setting up your first aquarium! By following this guide and being patient during the cycling process, you’ve laid a solid foundation for a beautiful and thriving aquatic ecosystem. Remember, fishkeeping is a continuous learning process. Don’t hesitate to join online forums or visit your local fish store for advice. Enjoy the tranquility and beauty of your new underwater world!


0 Comments